List of supplies:
6 different digital designed papers
12 pages of matte Presentation Paper
Paper cutter
Scissors
Tim Holtz Tiny Attacher Stapler
Printer
I printed on both sides of (12) - 8.5 x 11 inch Presentation paper(using a different pattern for the opposite side). I printed 4 of each combo I chose to put together.
After printing, you may need to trim off the white edge on all 4 sides of each paper. Then place each paper lengthwise in your trimmer and cut into 1 inch wide strips x roughly 10.5 inches(remember you trimmed off the white outer edge.)
Cut a piece of plain white paper the same way in a 1 inch strip x the same length of your patterned strips and then fold it in half and cut along the fold. You will use this 1/2 strip to help you place the long strips back on your cutter to cut each long strip in half. This will save a lot of time cutting multiple strips at a time.
Line up all 8 strips and cut them in 1/2 all at once.
You will get (16) 1/2 strips out of each page. You will end up with (192) 1/2 strips in all.
Remember these are all printed double sided so find a pleasant color pattern before you start stapling. Below are the opposite sides of each of my 6 patterns.
Now get your Tiny Attacher and start making loops and overlapping at the ends about a 1/4 inch. You can put one staple in the middle of each overlapped end. Keep your 6 stacks of paper in a row and just use one of each and then start over again. Doesn't the inside look pretty with a patterned printed on both sides?
I ended up with about 18 feet of garland when I was finished!
It went around my tree about 3 times.
And here is a closeup of the garland on the tree!
The digital designs I used were from the Jessica Sprague Christmas Blog Train(2010)


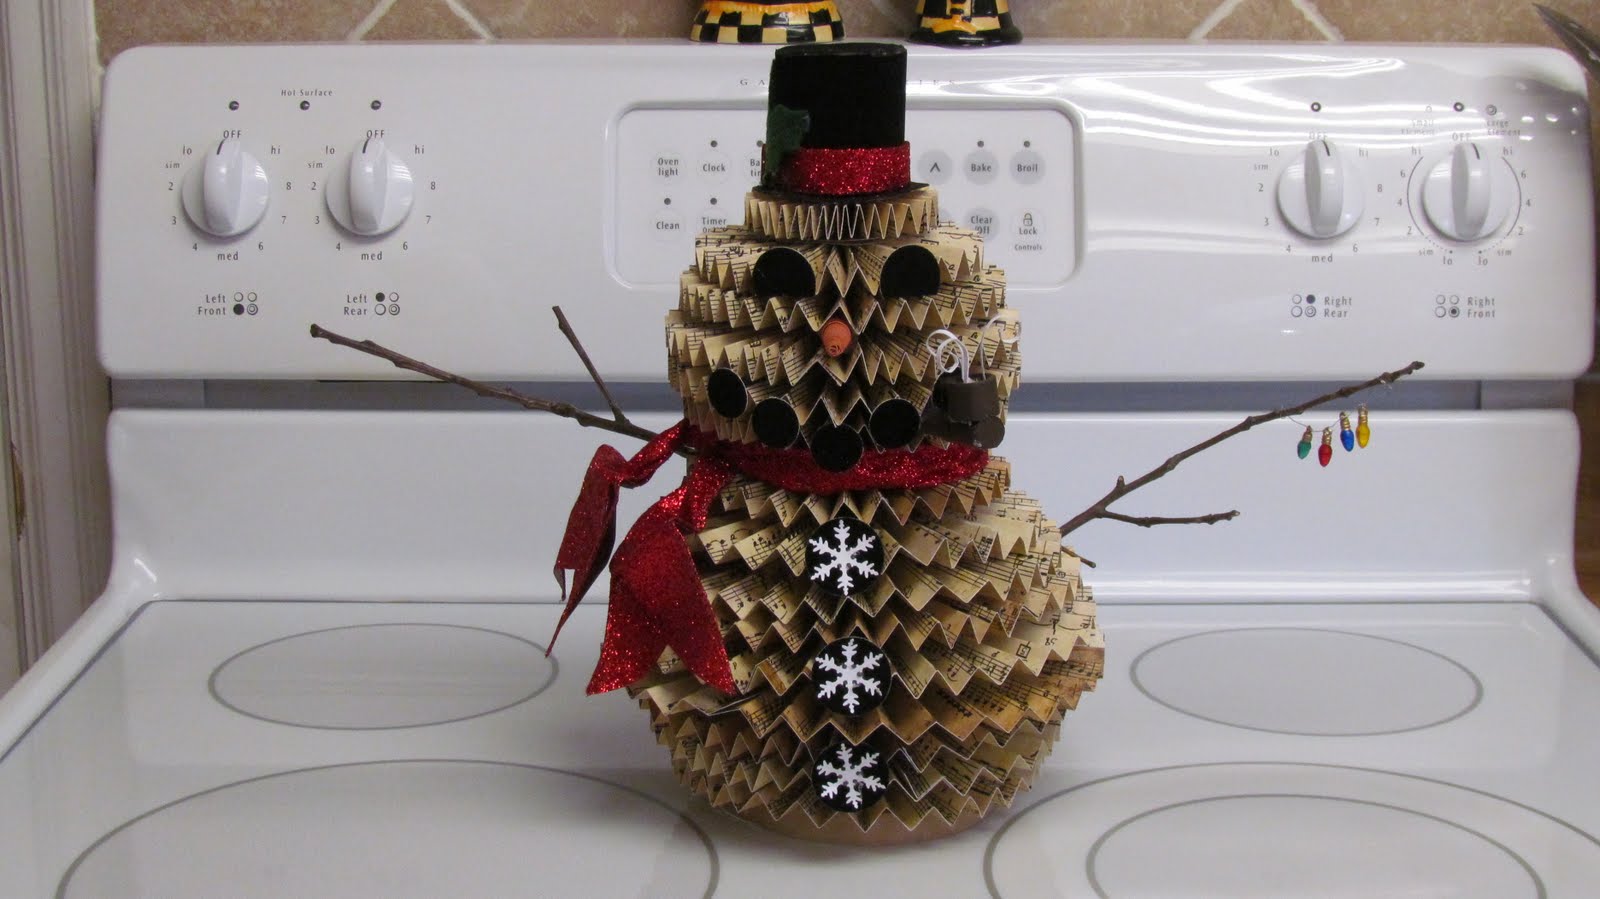 The girls that I scrapbook with every week came across this project pattern for a snowman at Archivers ...so we just had to make it...since I love snowmen and collect them, he just fit right in to my snowman family.
 Go to http://www.archiversonline.com/ideas/home-decor-rosette-snowman-3414 for the directions...oh in addition to the directions...my friends husband made us a 4 or 5 inch round platform and glued a dowel rod into it...so that the rosettes are stacked with the dowel rod going thru the center, which makes him very sturdy! Traditional snowmen are white but I wanted to try a tattered sort of look so I use 12 x 12 music note paper instead of white paper.
 Betty shared such a neat idea for paper trees. I made mine using My Mind's Eye Lost & Found papers; glitter everywhere! I had seven sizes of dies for each tree and short bamboo skewers, about 8 inches. Some trees were layered with 3 of each size and others with 4. Both look wonderful! Thanks Betty!


 Thanksgiving Greetings to all! These square cards are 5.25" x 5.25" but under the 1/4" thickness limit. Don't' forget to use the surcharge plus postage if mailing.


 I thought it would be more sturdy to use these paper mache boxes I bought at the craft store for the base. I painted them, and brushed some stickles over them to make them sparkle as well as brushing stickles on the tree branch edges for the sparkle.
  I cut and laid out my scalloped tree parts to get the colors in the order that I wanted them, using all paper from my stash and scraps.
 Here are the 3 trees I made using 3 of the pedestals I just finished making...I'm having fun crafting but not getting a whole lot else done.

 This was a fun project! I hope you get make some & enjoy it as much as I did!


 This fall Place Setting card. I'm sure I could come up with a dozen uses for this card.
 and these 2 adorable scary scarecrows...I believe there are about 10 different scarecrows on the cartridge plus some words. (I think the scarecrows should be pushed further down in the gords probaby.
 Overall it was a nice class, and was fun taking it with 3 of my very good friends!
 Then I took Halloween patterned paper and cut to cover each container...I am bad about abusing adhesive...I use a lot...a girl wants to know that stuff will stick, long enough to give it away.
 I made six treat containers...one extra for our cute little neighbor boy!


