Wednesday, November 16, 2011

Key Lime Pie

Yummy!!! I made a Key Lime Pie today with a Meringue top! Can't wait to have a piece when I get home from work! Pulled the last few limes off of my tree to make this.....and made the crust from scratch too!  CLICK TO ENLARGE PHOTO 

Here is the recipe!

Ingredients:
Graham Cracker Crust
1 1/4 cups Honey Maid Graham Cracker Crumbs
1/4 cup sugar
5 T. margarine, melted
Mix above ingredients well and press into the bottom and sides of an 8 inch pie tin. Bake @ 350 degrees for 8 minutes.

Filling
3 egg yolks
2 t. lime zest
1 (14 oz.) can Eagle Brand Sweetened Condensed Milk
2/3 cup freshly squeezed Key Lime juice, or store-bought
Beat egg yolks and lime zest with an electric mixer in a mixing bowl for 5 minutes on high speed. Gradually add the condensed milk and continue to beat an additional 3 to 4 minutes until thick. Lower the mixer speed and slowly add the lime juice just until mixed in good....no longer. Pour the mixture into the baked pie shell and bake for 10 minutes @ 350 degrees. Cool on a wire rack. You can top with Cool Whip or Freshly prepared whipped cream, or top with meringue like in the picture above. See below for whipped topping and meringue instructions.

Whipped Cream
1 cup heavy or whipping cream chilled
2 T. confectioners sugar
Whip the cream and the confectioners sugar until nearly stiff. Spoon onto pie.

Meringue Baked Topping
4 egg whites
1/2 t. cream of tartar
1/2 cup sugar
Whip with electric mixer the egg whites and cream of tartar on high speed until soft peaks form. Gradually beat in sugar on medium speed. Beat for 4 minutes or until sugar is dissolved and stiff glossy peaks form. (I didn't beat mine for 4 minutes). Spread over pie sealing to the edges of the crust to prevent shrinkage. Use the back of a spoon to create little curly peaks. Bake an additional 13-15 minutes to brown on the middle rack in the oven set to 350 degrees. Don't burn the top. Let cool for 3 hours before cutting. ENJOY!

Sunday, November 13, 2011

Christmas Tree with Nesting Scallops

This was definitely a fun Christmas Tree to make (all 3 pictured at the bottom of this post)...thanks to Julie from my Wishful Scrapbooking Group for sharing this link with the directions on how to make this project.

http://lifestylecrafts.com/blog/nestingscallopstree/


I thought it would be more sturdy to use these paper mache boxes I bought at the craft store for the base. I painted them, and brushed some stickles over them to make them sparkle as well as brushing stickles on the tree branch edges for the sparkle.


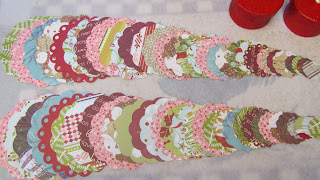
I cut and laid out my scalloped tree parts to get the colors in the order that I wanted them, using all paper from my stash and scraps.


Here are the 3 trees I made using 3 of the pedestals I just finished making...I'm having fun crafting but not getting a whole lot else done.


Pedestals for Home Decorating!


This was a fun project! I hope you get make some & enjoy it as much as I did!

Supplies:

1. Glass or ceramic dinner plate (can use any shape and size as well as bowls)
2. Sundae glass,andlesticks (can be any size you choose. I even used a shot glass)
3. Quik Steel Epoxy ( or something simular, available at Hobby Lobby or other craft stores), a
4. Paper plate, & plastic spoon or craft stick
5. Rustoleum 2x Coverage spray paint (I used Krylon)
6. Paper doilies (optional)

Step-by-Step Instructions:

Prepare your plates, sundae glasses &/or candlesticks by:

1. Cleaning them thoroughly and letting them dry completely. If you are doing more than one, decide which plate will be matched up with which base. You want a variety of heights. I started out going to the local thrift store looking for glass candle holders, dessert cups, plates etc...that looked good together to form my pedestals.


2. Take the epoxy from the packaging. Squeeze into a paper plate, about a dime-size of each part of the epoxy. Quickly mix together with the end of a plastic spoon or craft stick. You will feel it generate heat as it mixes. Use the end of the spoon or craft stick to place the epoxy around the bottom of your glass or candlestick – whatever end will be attached to the plate. Try to be neat but this epoxy will pretty much be covered up by spray paint so don’t worry about being perfect. Place it in the center of your plate and place something heavy on top (like books) to exert pressure.


3. Using a large cardboard box to catch the over overspray, place your pedestal face-down in the box. Spray the pedestal completely and generously with Rustoleum 2x Coverage spray paint. Let dry. Turn the pedestal over and spray paint the top of your pedestal. Let it dry. Touch up any spots you missed and let it dry completely before using.


These were so easy to make...and I was able to get them glued and sprayed, and put away all in the same day. I can't wait to Decorate for Christmas now...I may use a couple on my kitchen table and spread the rest out thru the house...will just have to see. I also thought of buying some decorative wreaths or outside candle decorations for setting on the plates and putting my candls or decorations inside that...and the more I think about it I want to go out and buy more dishes and make more to use for different seasons...or I may just respray paint these...the possibilities are endless...have fun!!!

Thursday, October 27, 2011

Fall Cards and Scarecrow Decorations

I just got home from my first Cricut Club Class, it will be once a month and I was so excited that I went ahead and signed up for the next 2 months.

In this class we got the cartridge Simply Scarecrow, to make this Fall card,

This fall Place Setting card. I'm sure I could come up with a dozen uses for this card.


and these 2 adorable scary scarecrows...I believe there are about 10 different scarecrows on the cartridge plus some words. (I think the scarecrows should be pushed further down in the gords probaby.


Overall it was a nice class, and was fun taking it with 3 of my very good friends!


Wednesday, October 26, 2011

Halloween Candy Gift Holders

I'm always seeing ideas or thinking up ideas to do with containers for the grandkids for different occasions...I started empting these Crystal Light containers and then saving them, thinking they would make something cute some day...so Halloween is coming and I decided to decorate them for the kids for Halloween.

I took the empty container and took off the wrapper...tossed the lid in the trash.

Then I took Halloween patterned paper and cut to cover each container...I am bad about abusing adhesive...I use a lot...a girl wants to know that stuff will stick, long enough to give it away.


I made six treat containers...one extra for our cute little neighbor boy!


Then I decorated with ribbon and halloween left overs from last years treat boxes (What was I thinking, I forgot to put buttons and stickles on them)...put one package of Pixy Stix in each container, but wrapped them up in tissue paper first so the Stix wouldn't fall clear down in the bottom of the container...I thought they would look cute sorta sticking up there.


And now all finished I think they look pretty cute...and I'm sure the kids will love them...I'm just gonna let them pick the one they want as the come to the house...and will give the neighbor boy the last one standing!


Snowman Christmas Card

This is my 3rd Christmas Card that I made for a Swap that I hosted just this month...to see the other 2 cards I believe I posted them back in January or February. I just love Christmas time and making cards and it works out really well to get the swap finished by the end of October so the girls can get on with the Season.

Saturday, October 15, 2011

Fun with Letters


I was inspired to fill an empty wall, The original idea, using the big R and little g, came from Better Homes & Gardens craft ideas online. I thought using my husband's name and initials along with mine would make the creation a bit more personal. I found a lot of letters in my craft stash. Hobby Lobby had a great selection of letters: wood, metal, cork and composite. I did find the Scrabble tiles and racks at an antique store in Grand Rapids MI. Turns out they're not antiques but what a great find for my project. Oh, and the Dollar Stores - what a great place to find picture frames. A little paint, a little glue, a little paper, some frames and those damage free wall hangers make this an easy project!


Friday, October 7, 2011

Flowers Everywhere!


Flowers Everywhere!

Flowers Everywhere!

We received a Thank You and I just had to share because it's handmade! The flowers and polka dots just made everything so cheery. Each chocolate nugget in the tin had a digital printed sleeve with the words 'Thank You' in different languages. The tin wrapper was layered with a rectangle, scalloped edges, pleated flower, punched circle center and lots and lots of punched flowers with rhinestone centers. TO OUR DEAR FRIENDS banner was stamped and cut out.

The card itself used the flower paper and MORE punched flowers! Isn't the single brown flower the cutest?


Sunday, October 2, 2011

ATC

I'm getting ready to go to Las Vegas this week on Thursday for the 4th Annual Spraguefest.  What's a Spraguefest you ask?  It's a gathering of the Jessica Sprague community.  Jessica Sprague has an online website where you can take fantastic classes online...and the community is friendly and very supportive.  Jessica teaches digi scrapbooking, photo editing, hybrid classes and teaches classes on Photoshop.  This will be my first Spraguefest...and Tony is going with me.  We are going to be trading Artist Trading Cards (ATC) and I made two versions to share with the other crafters there.  I did not make the background papers....they are from a group of papers that were supplied for one of the classes were are doing in Vegas, but I did make the halftone brush that's in the background upper left corner.  On the back of each ATC I have put my name, user ID for the Jessica Sprague website, blog address and email contacts.  CLICK TO ENLARGE PHOTO